

How To Make Ip Static Windows 10
If you are experiencing problem with your network connection and have information technology configured to DHCP then, figuring out your IP address tin exist quite a task. Using Static IP Address helps avert IP accost conflicts betwixt networked devices and enables their easy management. This article volition show you lot how to assign a static IP address on a Windows 11/10 computer.
Assign a static IP address in Windows 11/10
In most cases, the IP addresses for PCs or computers are automatically configured to Dynamic Host Configuration Protocol (DHCP) by the respective router. This is useful as the devices connect to your network instantly. You salve the trouble of manually configuring the IP address for each new device yourself. However, at that place'southward one shortfall associated with the process – The device'south IP address can change from time to time.
Setting a static IP may exist required if y'all regularly share files, share a printer, or when configuring Port forwarding. We will encounter iv methods to do information technology:
- Via Control Console
- Via Windows Settings
- Using PowerShell
- Using Command Prompt.
1] Setting a static IP address via Command Console
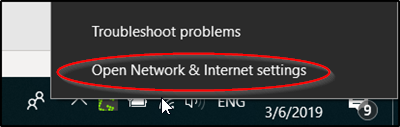
Right-click the network (or Wi-Fi) icon visible on Windows 10 Taskbar.
From the list of 2 options displayed, select the latter one – Open Network and Internet settings.
Go to Wi-Fi settings and ringlet down a chip to locate 'Related Settings' section. When found click on the 'Modify adapter options' link visible there.

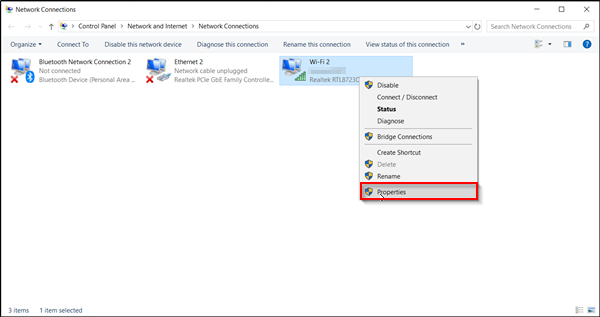
Instantly, a carve up window will open and straight you to the Network Connections section of the Control Panel.
Correct-click the network connection you need to set a static IP-address for and select 'Properties' option.
Later that, select Internet Protocol Version 4 (TCP/IPv4) seen under 'Networking' tab and hit the 'Backdrop' button.
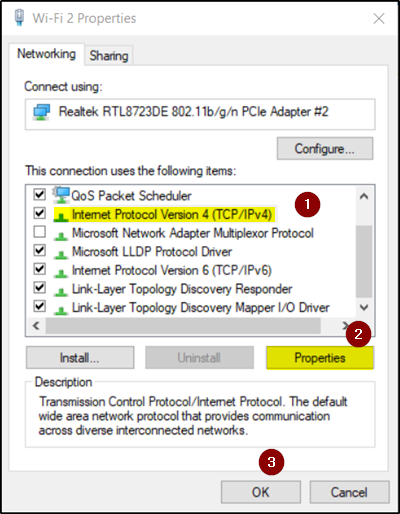
Switch the selector to 'Use the post-obit IP address'.
Now make the entry for the post-obit fields, respective to your network setup.
- IP address (Notice information technology using ipconfig /all command)
- Subnet Mask (On a home network, it is 255.255.255.0)
- Default Gateway (Information technology is your router'due south IP address.)
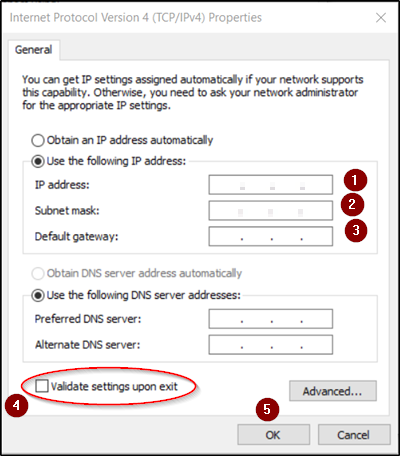
In the cease, practise not forget to cheque 'Validate settings upon exit' option. Information technology helps Windows to quickly check your new IP address and other relevant information to ensure that it works.
If all looks expert, printing the 'OK' button and close out of the network adapter's properties window.
2] Assign Static IP Address via Settings
Windows 11
Right-click the Windows button on the Taskbar and select Settings from the list of options. Alternatively, you can press Win+I in combination to go to the settings directly.

Select Network & Cyberspace from the side panel on the left and expand the Wi-Fi menu.

Select your current connection, i.e., the network to which you are connected.

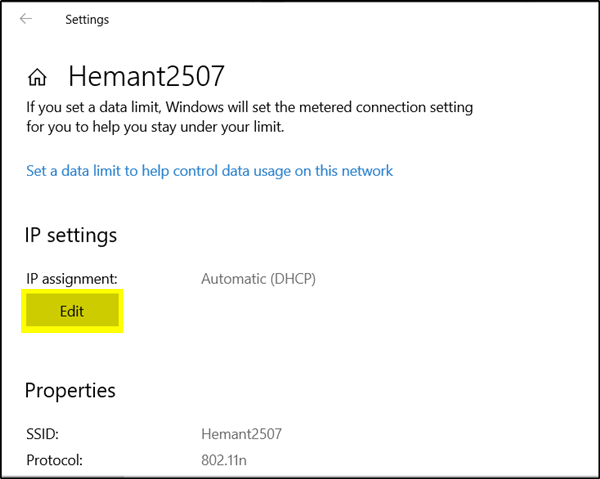
When directed to a new screen, coil downwards to IP assignment entry, hitting the Edit push button next to it.

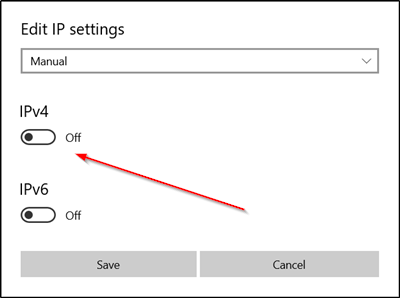
Now, when the 'IP settings' window pops up, hit the drop-down arrow and select the 'Manual' pick.

Slide the toggle next to IPv4 to the On position.
Now, fix the static IP address. Also, set the Subnet prefix length (subnet mask). If your subnet mask is 255.255.255.0, so the subnet prefix length in $.25 is 24.
In one case done, configure the Default Gateway address, Preferred DNS address, and Save the changes.
Windows 10
Click Settings icon and cull 'Network & Cyberspace' tab.
Select Wi-Fi > Current connectedness, i.e., network to which you are connected.

Scroll downward to IP settings section and hit the Edit button.
Then, when the 'IP settings' window pops upward, hit the drop-down arrow and select 'Manual' option.
Plough on the IPv4 toggle switch.
Now, set the static IP address. Likewise, set the Subnet prefix length (subnet mask). If your subnet mask is 255.255.255.0, then the subnet prefix length in bits is 24.
Once done, configure the Default Gateway address, Preferred DNS address and Relieve the changes.
Read: Types and Classes of IP addresses explained.
3] Assigning Static IP Address via PowerShell
Open Powershell equally Administrator and enter the following control to view your electric current network configuration-
Become-NetIPConfiguration
Following this, note downwards the post-obit data:
- InterfaceIndex
- IPv4Address
- IPv4DefaultGateway
- DNSServer.

Afterwards that, enter the following command to fix a static IP address and press Enter.
New-NetIPAddress -InterfaceIndex 15 -IPAddress 192.168.29.34 -PrefixLength 24 -DefaultGateway 192.168.29.one.
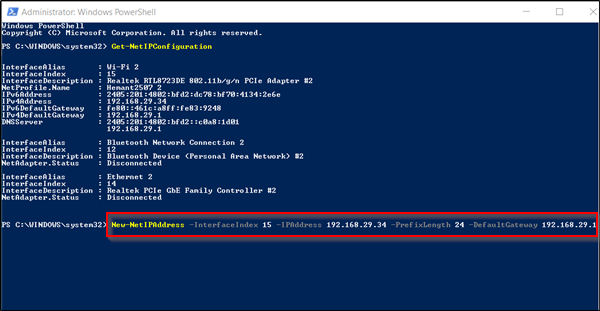
At present, change DefaultGateway with the default gateway accost of your network. Make sure to change the InterfaceIndex number with the 1 corresponding to your adapter and IPAddress with the IP address you lot want to assign to your device.
When done, Type the post-obit control to assign a DNS server accost and printing Enter.
Set-DnsClientServerAddress -InterfaceIndex 4 -ServerAddresses 10.1.2.one
Salve the changes and exit.
four] Assign a Static IP Address using Control Prompt

To prepare a static IP accost in Windows x using a command prompt, follow the below suggestions:
Correct-click on the Start button and select Run to open the Run dialog box.
Type cmd in the text box and printing Ctrl+Shift+Enter keyboard shortcut to run the Command Prompt with administrative privileges.
In the Command Prompt window, type in the following text code:
ipconfig /all
When y'all printing the enter key, it will show all the current network configuration.
Nether the network adapter, write down the following information:
- IPv4 Address
- Subnet Mask
- Default Gateway
- DNS Server.
After that, execute the following command to set a new static IP accost:
netsh interface ip ready accost name="Ethernet0" static ip_address subnet_mask default_gateway
In the above command-line, brand certain to change Ethernet0 with the proper name of your current network adapter.
Too, replace the "ip_address subnet_mask default_gateway" the correct values for your example.
Once again, type the following command and hit enter to fix a DNS server address:
netsh interface ip set dns name="Ethernet0" static dns_server
In the in a higher place command-line, supercede Ethernet0 with the name of your current network adapter. As well, modify dns_server with the correct values of your DNS Servers.
Subsequently running the to a higher place commands, type exit and press Enter to close the Command Prompt.
I hope this helps.
What is Static IP connection?
A static IP as the name suggests is an IP accost that remains stock-still and never changes. So, in one case your device is assigned a static IP address, its number typically stays the aforementioned until the device is decommissioned or your network compages changes. Static IP addresses are mainly used by servers or other important equipment.
What is Static IP used for?
A static IP address offers convenient remote access which makes it easier to work remotely using a Virtual Individual Network (VPN) or other remote access programs. Besides, it enables more reliable advice [use Phonation over Internet Protocol (VoIP) for teleconferencing or other voice and video communications].
Source: https://www.thewindowsclub.com/set-a-static-ip-address-in-windows-10
Posted by: baumgriat2001.blogspot.com
0 Response to "How To Make Ip Static Windows 10"
Post a Comment